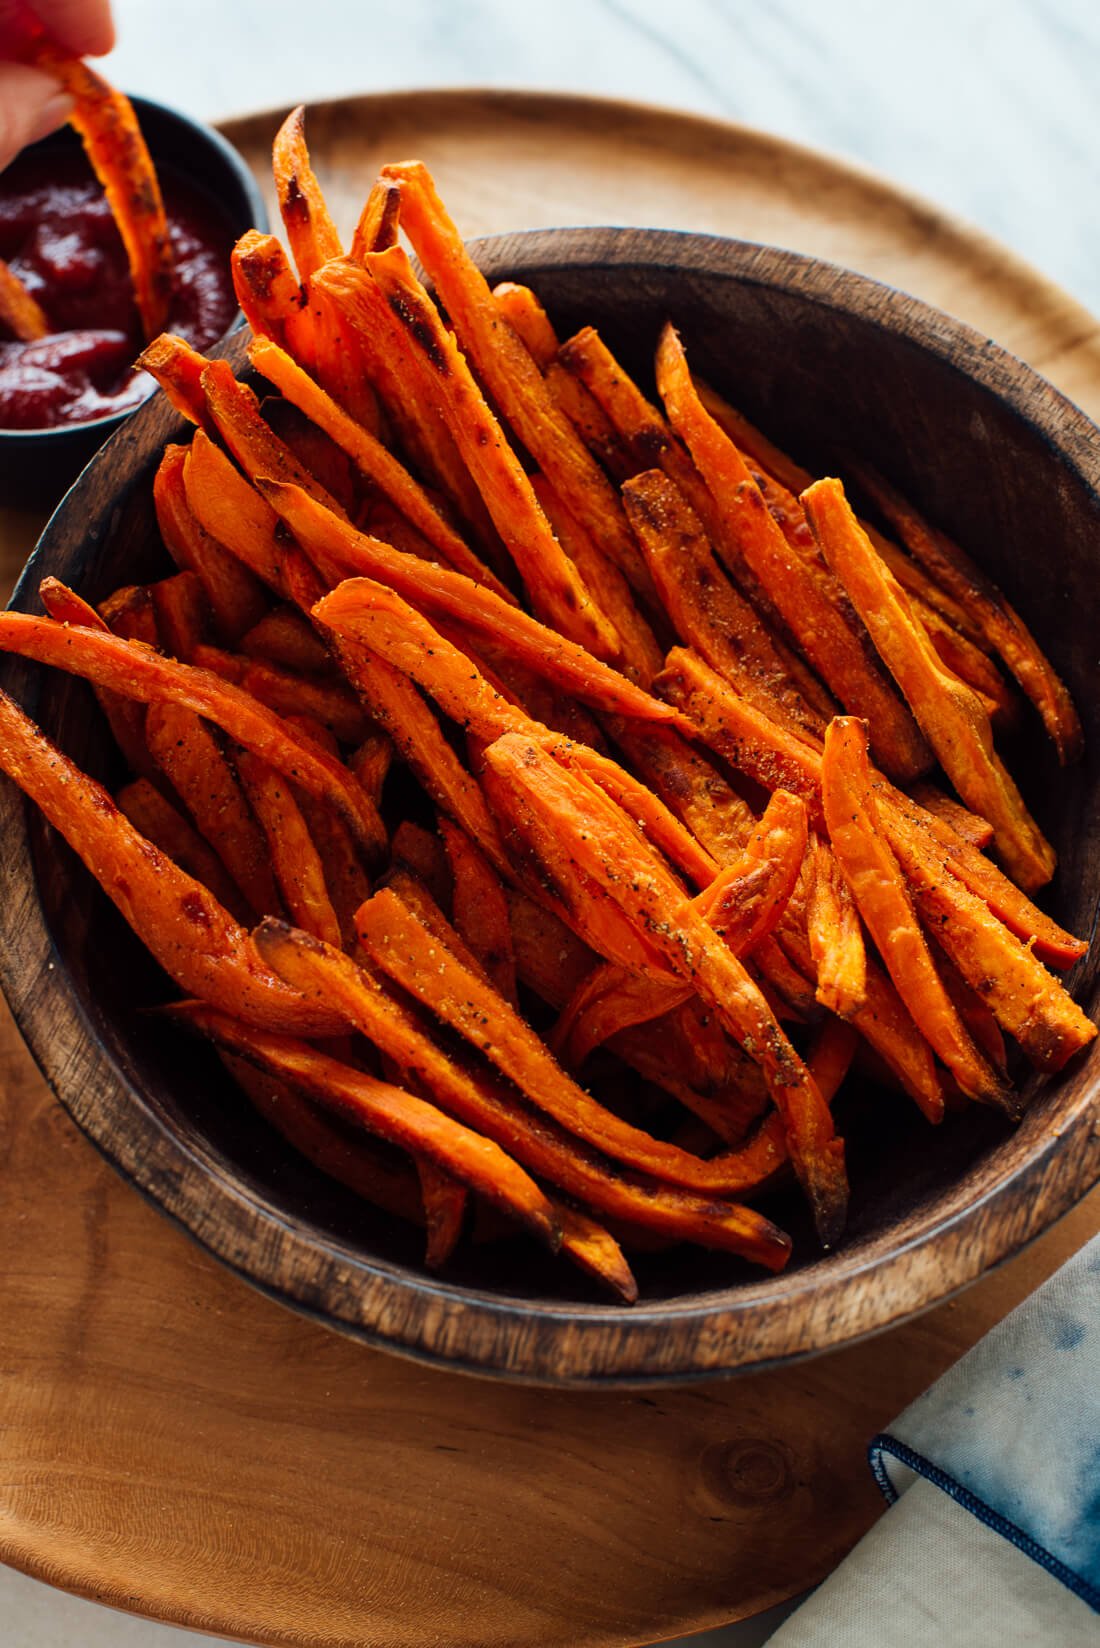
Crispy Baked Sweet Potato Fries
Learn how to make crispy, oven baked sweet potato fries! Tossed with olive oil and sea salt, sweet potato fries are an easy and healthy homemade snack.
Updated by Kathryne Taylor on August 10, 2024

These sweet potato fries will change your life. I’m serious! They are salty-sweet, crunchy, and spicy if you wish. Baked sweet potato fries have been one of my favorite snacks since I first shared the recipe eight years ago.
These crispy fries beat their fast-food fried Russet cousins in simplicity and ease. They require fewer cooking steps because they’re baked rather than fried.
Over the years, I’ve learned a few tricks to make my sweet potato fries even more crispy. Crispy fries or bust!
You’ll learn all of them as you make the recipe, but I’m sharing my top tips in more detail below. Are you hungry for sweet potato fries yet?
How to Make the Best Sweet Potato Fries
I’ve tried baked sweet potato fries every which way, and these elements really do make a big difference in the crispy factor:
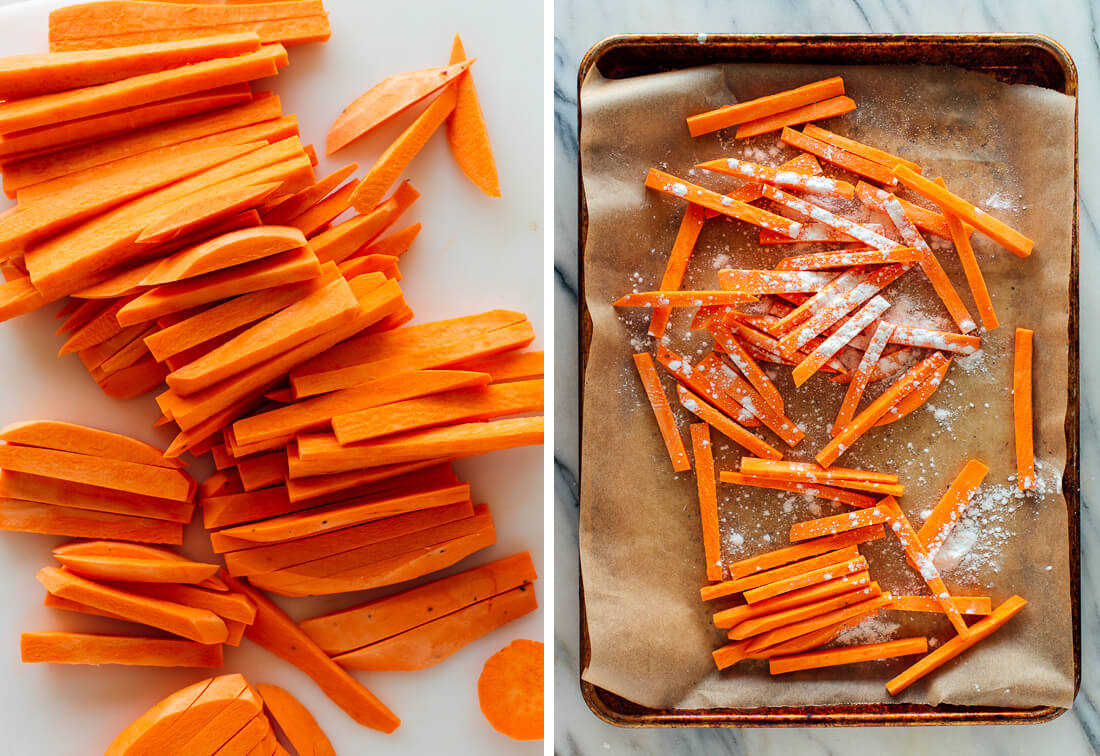
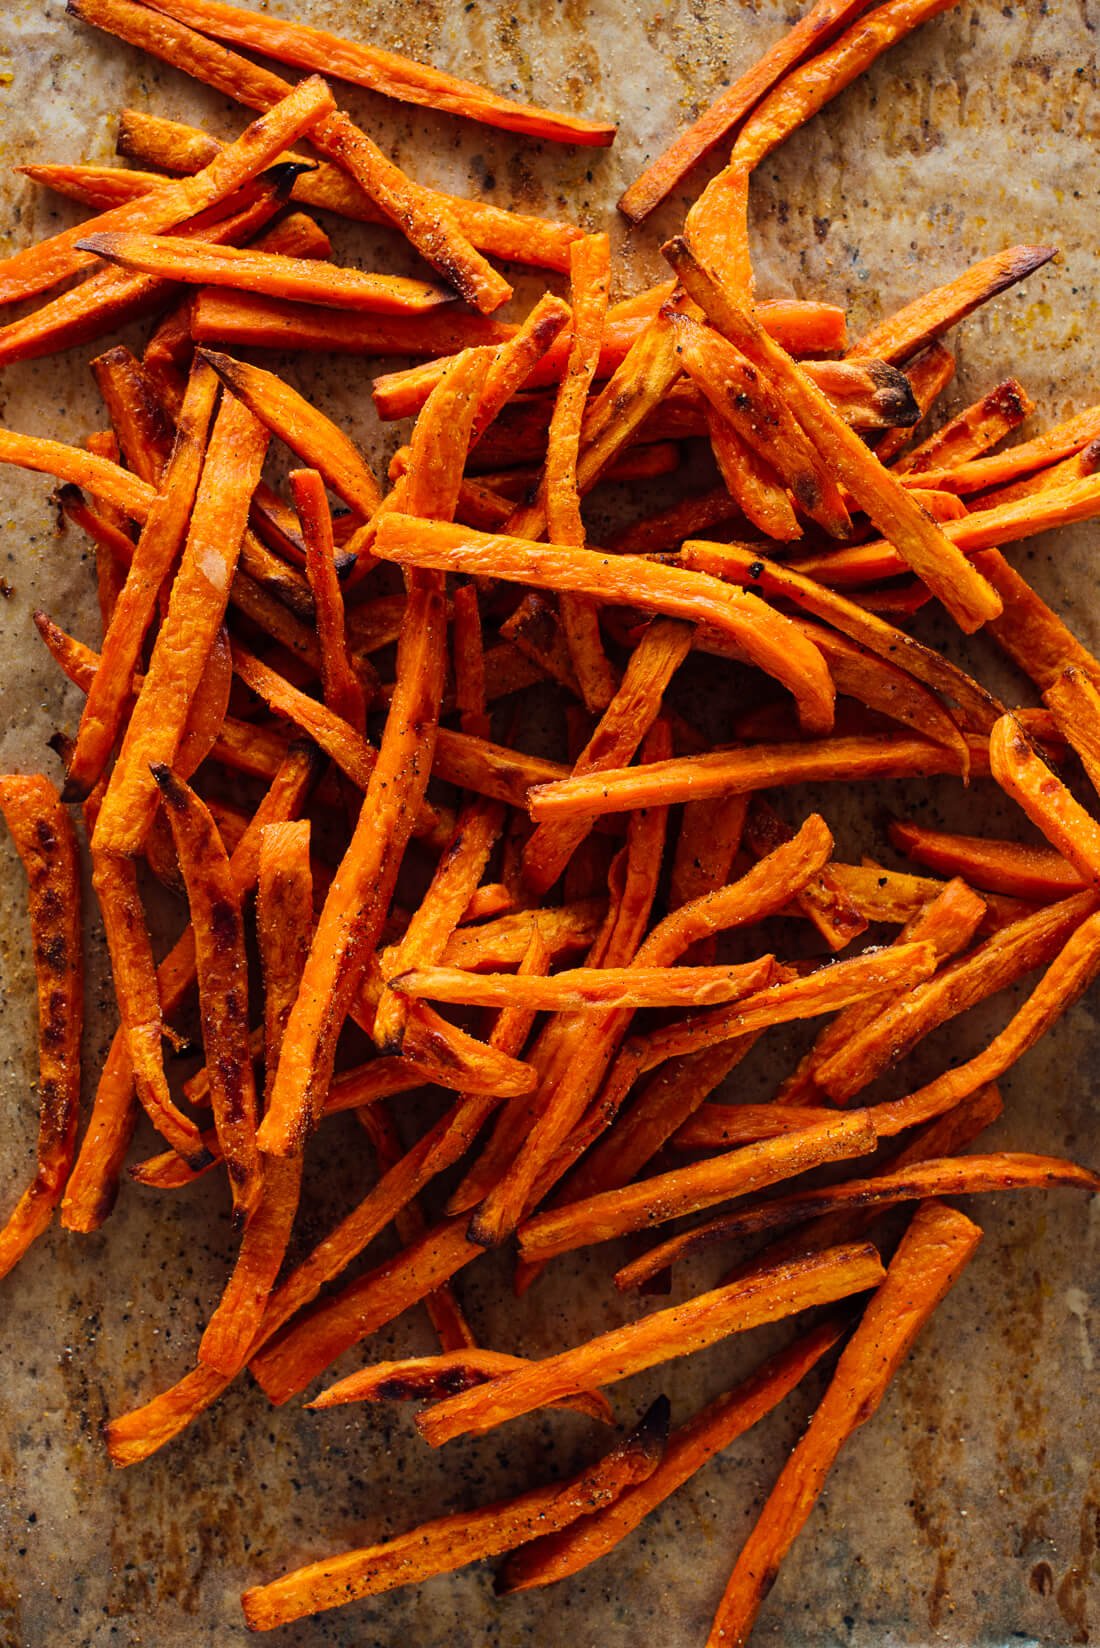
1) Slice your fries thinly.
You want your fries to be about 1/4″ wide, or close to it. Thick fries never get crispy.
Here’s how to slice a sweet potato into fries: Rest your sweet potato on its side on a sturdy cutting board. Working lengthwise, slice off a 1/4″ thick slab from one of the sides. Turn the sweet potato onto the flat side so it’s more stable. It gets easier from there!
Continue cutting the sweet potato into slabs, and then cut the slabs into thin fries. As you’re cutting the slabs, you’ll eventually want to turn the sweet potato onto the now-larger flat side to maintain stability.
2) Toss your sliced fries in cornstarch before oil.
Cornstarch really helps to get the outsides crisp! It’s a little trick I learned from a commenter named Jeni (thanks Jeni). I’ve played around with various amounts of cornstarch and olive oil and found the perfect ratio.
I’ve experimented with arrowroot starch as well, and it produced fries that were somewhat less crisp, but it’s worth using if that’s what you have.
3) Divide your fries between two pans and arrange them in even layers.
Overcrowded fries steam each other and never get crispy! You can fit one pound of fries per pan.
Be sure that each fry lies flush against the pan, not piled on top of other fries. The fries develop crisp edges when they’re resting on a hot surface.
4) Bake at 425 degrees Fahrenheit.
Any lower, and your fries will be soggy. Any higher, and the oil will start smoking. Plus, at higher temps your fries will turn from crisp to burnt way too fast.
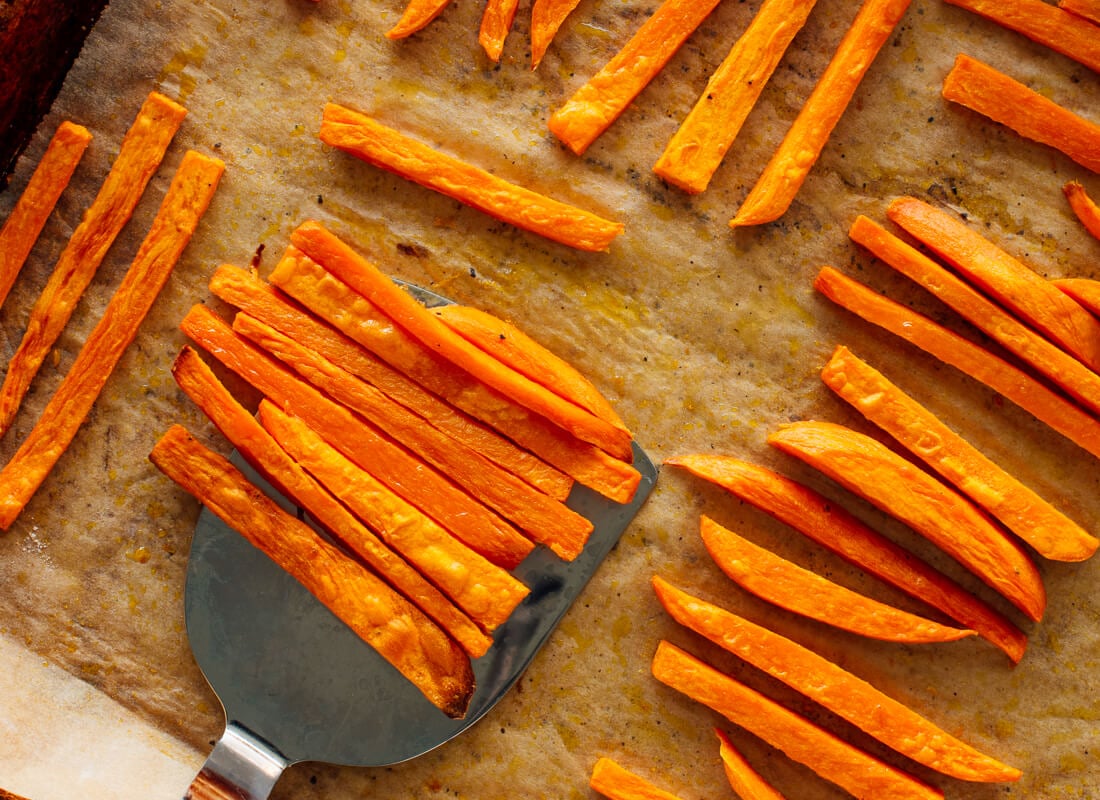
Halfway through cooking, you’ll flip the fries with a spatula and swap the pan positions (from lower to upper rack and vice versa). This helps ensure that they bake evenly, turning perfectly golden on the outside and cooking through on the inside.
5) Season last, if desired.
Add salt before baking the fries, but wait to add any spices until after baking. Otherwise, the spices will burn and lose their flavor. I love to balance the sweetness of the fries with a little cayenne pepper and garlic powder, and lots of freshly ground black pepper.
Another benefit of seasoning last? You can add spices to taste, so you won’t overdo it.
The Great Soaking Debate
I wondered if sweet potato fries would benefit from a soak in water like my crispy potato wedges do. Those wedges are made with Russet potatoes, and soaking them for 10 minutes in hot water helps release some of the starch in the potatoes and lets them absorb moisture, which leads to ultra-crisp outsides and moist interiors.
So, I tried soaking batches of fries in hot water, and batches in cold water, and baking them with and without cornstarch. You know what? It wasn’t worth the effort. Hot water actually seemed to inhibit crispiness. When I compared a batch of cold water and cornstarch fries with un-soaked cornstarch fries, the un-soaked actually fared better.
I hate extra steps as much as you do, so I’m pleased to report that you do not need to soak your sweet potato fries for great results!
Sweet Potatoes are Nutritious
Unlike regular deep-fried French fries, these baked sweet potato fries have a lot of redeeming nutrition properties. Standard orange sweet potatoes provide an excellent source of beta-carotene, which your body turns into vitamin A.
Sweet potatoes are also full of antioxidants and fiber, and have some beneficial blood sugar-regulating properties. Plus, they’re a very good source of vitamin C, manganese, copper, pantothenic acid and vitamin B6 (source). Winning!
Serving Suggestions
- These sweet potato fries would be awesome with my sweet potato veggie burgers (if you have a copy of my cookbook, Love Real Food, check out the updated version on page 177).
- I bet they would be nice with black bean soup or pinto posole.
- I’m happy eating them with just about anything, but they’d be especially fun with Mexican food, like tacos and quesadillas.
Recommended Equipment
You’re going to need some basic equipment to make these fries. Chances are, you already have everything you’ll need! These links are affiliate links.
- Sharp chef’s knife: Essential for safely slicing the fries into thin shapes.
- Vegetable peeler: Optional. I always peel my sweet potatoes, but you can leave the skin on if you prefer. Just give your sweet potatoes a good scrub and pat them dry before slicing.
- Half-sheet pans: These are large enough to accommodate 1 pound of fries each, and they have rims around the edges so no fries fall off. Half-sheet pans are the professional standard—all legit chefs and recipe writers use these when they create recipes, so if your baked recipes don’t turn out right, it might be your pan!
- Parchment paper: I recommend lining your pans with parchment paper so the fries don’t get stuck to the pan (there go your crispy edges).
Watch How to Make Sweet Potato Fries
Please let me know how these sweet potato fries turn out for you in the comments! I’m obsessed with them and hope you are, too.
Craving more crispy and salt snacks? You do not want to miss my ultra crispy baked potato wedges!
Crispy Baked Sweet Potato Fries
Learn how to make crispy, oven baked sweet potato fries! Tossed with olive oil and sea salt, sweet potato fries are an easy and healthy homemade snack or side dish. Recipe yields 4 side servings.
Ingredients
- 2 pounds sweet potatoes (about 2 medium-large or 3 medium)
- 1 tablespoon cornstarch
- ½ teaspoon fine sea salt
- 2 tablespoons extra-virgin olive oil
- Optional spices: freshly ground black pepper, cayenne pepper and/or garlic powder
Instructions
-
Preheat the oven to 425 degrees Fahrenheit with racks in the lower and upper thirds of the oven (make sure the top rack is about 6″ from the heat source and no closer). Line two large, rimmed baking sheets with parchment paper so the fries don’t get stuck to the pans.
-
Peel the sweet potatoes and cut them into fry-shaped pieces about ¼″ wide and ¼″ thick. Try to cut them into similarly sized pieces so the fries will bake evenly. Transfer half of the uncooked fries to one baking sheet, and the other half to the other baking sheet.
-
Sprinkle the sweet potato fries with the cornstarch (use 1 ½ teaspoons per pan) and salt (¼ teaspoon per pan). Toss until the fries are lightly coated in powder. Drizzle the olive oil over the fries (1 tablespoon per pan) and toss until the fries are lightly and evenly coated in oil, and no powdery spots remain (use your fingers to rub visible cornstarch into the fries as necessary).
-
Arrange your fries in a single layer and don’t overcrowd; otherwise they will never crisp up. Bake for 20 minutes, then flip the fries so they can cook on all sides. (The easiest way to flip them is with a metal spatula. Section by section, scoop up about ten fries and flip them with a quick turn of the wrist.)
-
Arrange the fries in even layers across the pans again, moving any particularly browned fries more toward the middle of the pan so they don’t get overcooked. Return the pans to the oven, swapping their positions (former top pan goes to the lower rack and vice versa).
-
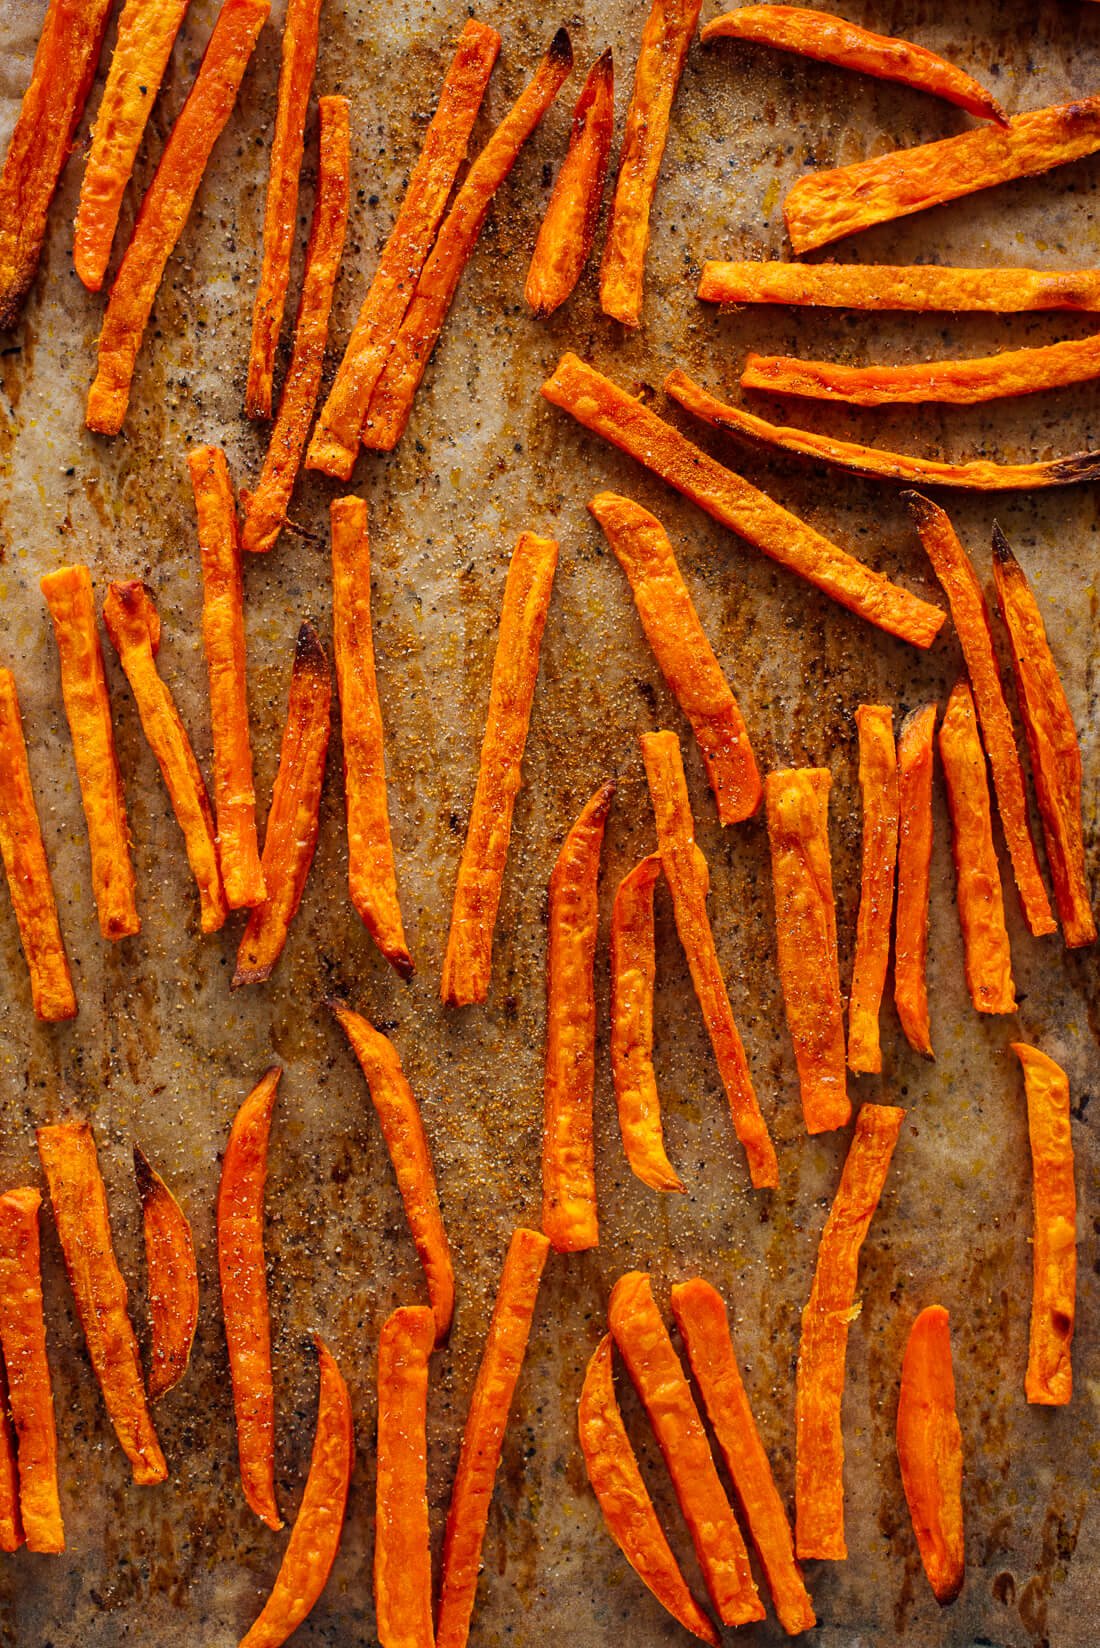
Bake for 10 to 18 more minutes, or until the fries are crispy. You’ll know they’re almost done when the surface of the fries change from shiny orange to a more matte, puffed up texture. Keep an eye on them, as they can turn from crisp to burnt quickly. Sometimes the lower pan will be done a few minutes before the top pan. Don’t worry if the edges are a little bit brown; they will taste more caramelized than burnt.
-
If desired, toss the baked fries with seasonings, to taste. I like to use lots of freshly ground black pepper, and a scant ¼ teaspoon each cayenne pepper and garlic powder. Serve warm!
Notes
Nutrition
The information shown is an estimate provided by an online nutrition calculator. It should not be considered a substitute for a professional nutritionist’s advice. See our full nutrition disclosure here.


Thanks so much! Struggled to find a good crispy sweet potato fry without having to deep fry them.
I’m happy you enjoyed it, Lisa!
Love this recipe, I use it 1 time every week give or take. I’ve also tried making them with just white potato’s and it turned out amazing. My family loves them with some good old faction A&W seasoning after they are cooked. Give this recipe 2 thumbs up.
Ohh and when ever I make them I used conventional bake and don’t do that interesting top rack bottom rack thing… but they always turn out amazing, for me. :)
I wonder if the bad reviews are due to the confusion surrounding sweet potatoes and yams – I’m in Canada and sweet potatoes are white on the inside, whereas yams are orange (like you have pictured) – I’m sure there is a difference in starchiness and how they cook.
Side note: will a silpat mat work in lieu of parchment paper?
Hi Katherine
I just made these sweet potato fries exactly per the recipe. They were in the oven for over 45 min. )my oven temp is correct) . Aside from the few that got burnt on the edges, the rest never got crispy.
I was quite disappointed after the hype.
Hi Shelley, I’m sorry to hear that. Was the pan over crowded at all? They were cut exactly to size?
yes they were for the most part cut the right size, and no the pan was not crowded, in fact I used my large cookie sheet. It seems that other people had the same issue as myself, so maybe there’s a flaw in the recipe?
Hi Shelley, Thank you for your feedback. I try to bring consistent recipes to you and test them several times prior to posting them. This is one I personally make all the time and don’t have that issue. Sorry to not have more insight.
These were a hit! Even though I don’t have the right type or size of pan my sweet potato “fries” turned out perfect. I had to use all three of my rimmed baking stones with parchment and bake them for 2 rounds of 20 mins. I followed all of the other instructions as written making sure to evenly massage in the cornstarch and oil. They take a bit of patience but they are worth it.
Thank you
You’re welcome, Kim! Thank you for your review.
These turned out great for me! I just kept an eye on them based on the comments below and made sure that I cut them thin! They came out delicious and crisp (which I always fail at when making sweet potato fries). Thanks Kate!
You’re welcome, Jacquelyn! Thank you for your review.
I am single so I typically make one sweet potato at a time. Are you saying that it should stay on the top rack the whole time? I found they were not ready to flip at 15 min but I could’ve kept them too large.
Hi Susan, I would suggest starting at the bottom, then switching like you would for a single recipe. Yes, if you cut them too large that will cause them to be soggy. Sorry they didn’t turn out for you!
Tasty and good? Yes. Crispy…not. No better than the a fe recipes I’ve tried and worse than a few.
They were absolutely delicious but the came out really soggy. There was no crisp at all and the inside was a little raw. Overall recipe is good just didn’t cook quite right. Not sure if it was just my oven but we had the heat really high and it was on the top shelf in a small oven. Not quite sure what I did wrong. Usually I’m a really good cook
I’m giving this recipe 2 3/4
* There was no 2 3/4 option so I did the closest and gave it a 3
Hi, how large did you cut your fries and it sounds like you may have not had them in the right spacing per the recipe. They need to make sure they aren’t over crowded. Sorry to hear you didn’t have great results!
Perfect! Fixed my craving and went great with those sloppy joes.
That’s great, T! Thank you for your review.
Tried this recipe for dinner and it tasted absolutely perfect!! This sweet potato fries recipe is definitely a keeper:) thank you for sharing this wonderful recipe :)
Thank you! I’m glad you loved it.
Just made this and it turned out great. I did a half batch. I also added the corn starch, salt and oil to the fries in a large bowl, tossing them between each ingredient. This gave them an even coat and didn’t leave a lot of oil on the the parchment paper when I arranged them in the pan. Also used the suggestion to start them on the upper rack and finish on the lower rack. Came out perfect. I wonder if the problem of sogginess and/or burning listed in some comments had to do with the sweet potatoes themselves. There are lots of variations, including sugar and starch content, as well as freshness that could have affected the outcomes.
Thank you for sharing! I’m glad you enjoyed them, Scott.
I followed this recipe exactly (using a scale to weigh out ingredients) with a Breville Convection oven. I also ended with a soggy mess in the middle and crispy goodness (a few even slightly singed) on the side. What this tells me is you reeeeeally need to be intimate with your oven before attempting this.
Hi, I’m sorry this didn’t work for you. The oven type does really matter. Convection oven doesn’t work well, you need a conventional oven.
Hi. Tried the recipe and it didn’t turn out well. I used arrowroot, since we avoid corn products – no cornstarch. Followed the instructions of sprinkling the starch, sprinkling the oil, then rubbing in the oil until the powder absorbed. Left the sweet potatoes in for 20 min and when I looked at them to turn, they were already quite burned. I flipped them (easier said than done on parchment but I did it) hoping the flip sides would be less burned. Gave them another 5 min. They turned out quite burned and not very crispy. Perhaps at 425F in a convection oven I should have counted on less time?
Hi Steve, I’m sorry this didn’t work well for you. This recipe was developed for a standard conventional oven, not a convection oven. That seems to be the issue.
I noticed how varied the results were for different people. I wonder if the differences are caused by the types of sheet pans people are using. I have both aluminum and steel sheet pans. I have noticed very different results with them in general. For the sweet potato fries, I would use my aluminum sheet pan, because in my experience any food that needs to bake dry and brown will quickly burn on a steel pan, while on an aluminum pan it will be slow to brown. That applies to making chips from tortillas, toasting nuts or granola, or baking a stiff cookie dough. A steel pan usually results in burned and stuck food before I can catch it. A lower oven temperature will slow it down a bit, but I’d rather work with an aluminum pan.
Not good… definitely a lot to change in this. I wouldn’t do the cornstarch method, but if you all want to, I would suggest an olive oil (or avocado oil) spray instead to reduce the mess and not make it lumpy. Also 425 is either way too high of a heat or the cook time is too long- probably have to take 10 min off that 30 min time elapse. Normal ovens will burn these thinner slices that the recipe calls for, so I would suggest 10 min cook, flip, then 10 min to be safe. Good luck everyone but this isn’t it
I’m sorry to hear this didn’t work out for you. Did you place the oven racks as stated in the recipe?
They didn’t turn out for me, I followed instructions, they were not crispy they looked a mess, soggy
Hi Jasmin, I’m sorry to hear that. Was the pan overcrowded?
What’s worse than fries sticking to the pan? Fries sticking to parchment paper. It was a nightmare trying to get the fries off the paper. This just did not work for me AT ALL. Once off the paper they never crisped up and I had piles of soggy fries I followed the instructions to the T – so much time spent cutting the fries to a uniform size only to have everything stick. Awful. I did one batch on the metal sheet and they turned out much better.
Hi Ariel, I’m sorry to hear that. I have made these several times and haven’t run into that issue. Did you toss them half way?
These were unbelievably delicious!! I have to admit I was a little nervous based on some of the reviews… But I follow the directions very carefully and these were fabulous! My husband and I both devoured them with lunch today. My only regret is that I only made a half batch! Lol will definitely make these again. Yum Yum!
I followed your recipe exactly! But I didnt have any parchment paper. I didnt think it would matter as I always make chips in my oven pan without a problem. I wish I’d read the comments first. Every chip stuck solidly to the pan! All I could salvage was a mushy mess and a hard to clean pan. Is it the corn starch that makes them stick like that?
Hi Becky, you need parchment to help them not to stick. I’m sorry they stuck. I hope you try it again with the parchment and let me know how they turnout!
I wish I’d read the ratings before wasting my time with this recipe. I followed it to a T and they turned out half burned, not crisp, and an unpleasant texture on the unburnt parts. Very disappointing :(
I’m sorry you didn’t love this recipe, Ella. I have made these several times without issue. It sometimes can come down to variability in ovens, correct size, etc. I appreciate your feedback!
I make sweet potato fries all the time and wanted to try cornstarch to make them crispier. All I got were baked wet fries caked in uncooked cornstarch. Had to toss it all
Hi Daniel, I’m sorry to hear that. Was your oven set to conventional, or convection? Also overcrowding the pan can impact it.
Yummy!
Loved the sweet potato fries. Thanks for sharing
You’re welcome, Janice!
Pretty good recipe. My only issue is that the cooking times may not necessarily work depending on your oven. After the first 20 minutes, mine were about 3/4 done, so I flipped them and let them cook for another 5 min— by then, they were done, and some of the smaller ones were beginning to burn. I am glad I checked after 5 min, and not waited the listed time.
These tasted pretty good for baked fries. I like mine with bbq sauce— it brings out a nice smoky flavor with sweet potatoes.
Hi Kyle, yes ovens can vary. Thank you for sharing your experience.
EPIC FAIL…:(
I followed the recipe to the T. Did all the steps, in the order asked…fries all burned and were limp. Very disappointed because this recipe is quite time consuming with the starch and the rest. I wish I would have checked the reviews first…will not make this again.
Hi Sara, I’m sorry to hear that. Do you have a convection or conventional oven?
What is the quantity of corn starch? The itemized list says 1 tablespoon, but the break down of the recipe says 1/2 tsp?
Hi Emily, I’m not sure where you are seeing that. Refer to step 3. It’s 1.5 per pan.
thank you so much for to teaching us how to make sweet potato fires it is so useful because it hard for me to make them
I made these last night, followed instructions…. they turned grey!!!! :( not burnt, just turned a weird color… also it was a bit powdery… I don’t know what I did wrong!!
Hi Gigi, I’m sorry to hear that. I’m not sure what happened. I haven’t had that issue before.
This was great! I haven’t enjoyed sweet potato fries at most restaurants. This was easy and I’m no cook! I used one of my grandmother’s old tricks to get the starch, oil and salt to stick to the fries.I put the corn starch in a large baggie, then put in the fries and shook it to cover all of them. Then, in the same bag, I added the olive oil and repeated. After that, the salt and did the same. All of the fries were completely and evenly covered! Yum!
That’s great to hear, Veronica! Thank you for sharing.
This recipe worked out perfectly! Before baking, one of the sweet potatoes didn’t seem great on the inside yet it still turned out awesome using your recipe. I really appreciated how specific you were about using two baking sheets and that you saved your recipe-users a dish by suggesting the tossing right on the baking pan. Thank you for helping me make my daughter’s fave new snack for the first time!
What a wonderful recipe. My wife and I absolutely love how the fried turned out. Definitely restaurant quality. Thank you Kate!
Hi Kate,
I just wanted to reach out as I read all of the comments since Dec 17, 2020 and I see all of the problems many folks have had, and my attempt to to make oven baked sweet potato fries was a long journey that had pretty much all of those same problems.
Your recipe is pretty much the same as the one that finally freed me from buying Alexia brand frozen sweet potato fries (my favorite frozen SP fries) for oven frying.
The only differences in your recipe and the one I settled on several years ago is that I didn’t rub the corn starch into the fries. I used a ziploc bag or a bowl to coat the fries with corn starch then added the oil and seasonings. I also soak my sweet potato fries after they are cut in water, but I think that you are right that there is no need to soak sweet potato fries based on the very limited amount of starch that comes out. I think that it is much more important to soak regular (more starchy) potatoes in water after cutting into sticks.
Anyway, my point is that there are lot of variables that can make your recipe come out badly.
Here’s a brief list:
1) All sweet potatoes aren’t created equal
2) What is your oven’s true temperature
3) How accurately can you judge 1/4 of an inch by eye
4) Watch what is happening in your oven instead of the clock
Depending on how long your sweet potato was sitting in the grocery store or on your counter, the moisture content can vary by a large amount and that will affect how your fries come out. Sticks from high moisture sweet potatoes will be limp when sticks from low moisture potatoes may already be burned.
I own several ranges between our home and rental properties. Even relatively new stoves can easily be off by 25 to 50 degrees in temperature. I would recommend to everyone here to make a small investment in a Taylor oven thermometer and see if your oven is accurate in temperature. I have several Frigidaire Gallery ranges and they wisely allow you to put an offset in temperature to correct errors that can be quite large. I’ve had to correct all of them.
The size that you cut your fries makes a huge difference in the outcome of your final product if you just use the published bake time without monitoring what is going on in your oven.
My favorite frozen Alexia sweet potato fries are cut in perhaps 3/16 of an inch sticks. They have the entire process down to the smallest detail and their results are very predictable.
That level of consistency just doesn’t exist for the home sweet potato oven fry community.
So for my home sweet potato oven fries, I plan on 40 minutes at 425 degrees F. I set an external timer at 12 to 15 minutes just to be sure nothing unusual is going on. Then set the time to check every five minutes or so until it’s time to turn the fries.
I should add that initially, I place every fry individually on the sheet pan with no contact between any of them until they need to be turned. I don’t worry too much about a little contact between fries after turning.
But the key point is that you need to monitor what is going on in your oven.
The posts that say the recipe doesn’t work because the fries were all burned suggests to me that they were not interacting with their fries enough.
The posts that say the fries came out limp and mushy tell me that they turned them way to early. They should have looked for that little bit of browning on the top surface before turning.
I appreciate you sharing your in-depth experience, Ed. Yes, monitoring, size, spacing, etc are all very important to achieve good results in the end.
I’ve made these twice now with varying results. The first time they were the best because I used a middle position for the rack in my oven. They took longer to crisp up than I expected so I moved them to a lower position the next time. That was a mistake because they were too close to the heating element. What you warned about, burning too quickly, happened with these. Our stove is at the end of its life cycle and has become a bit janky so the heat is not always even but I think that it was more of a user error. When I got them right, they were good. I sprinkled some fresh finely diced rosemary on them at the end. My daughter makes sweet potato fries all of the time and she just cuts them and puts them in the oven. They never seem to be crisp. I’ll share your technique with her. I also used this recipe on potatoes to make french fries and they were really good – very crispy and probably some of the best fries I’ve ever had.
As an aside, I think I am going to order your “Love Real Food” cookbook as a Christmas present for my sister that is a vegetarian. I looked at the table of contents on Amazon and it looks interesting. If it is helpful to you that I order through your website rather than directly through Amazon, I’ll do that (for affiliate $).
Thank you for sharing your experience and support! I hope your sister loves my cookbook, Ken.
These were pretty good! Most of mine turned out more chewy than crunchy, and a few got burned, but they are definitely the crispiest sweet potato fries I’ve made yet.
Which sauces do you think would go best with them? (I tried peanut sauce tonight.)
I salted my fries for 20 mins first to pull some of the water out as you do with eggplants.
Best fries I’ve ever eaten, anywhere, ever! I just did one small white sweet potato. Cut in 1/4″ size strips. I shook in plastic bag with the cornstarch, small amount, like top. or less. Shook hard. Then 8 poured olive oil into same bag, again shook like crazy. Dumped on small baking sheet lined with parchment, well separated them,, put into 425 oven. 15+ mins, turned when browned and another 15. OMG. Crunchy, delish. Best ever. Thanks for this recipe!!!
Followed your directions and measurements but I didn’t cut them equally thin but the thinner ones were perfect! They were awesome! My hubby is still talking about them!
Thank you for sharing!
Ovens vary widely on how accurate they are so that can account for inconsistent results. Calibrate with a separate oven thermometer. Then get a loaf of day old bread and spread all over a rack. Bake in a 375F oven and see if you get hot or cold spots.
The other thing than cooking to temperature is to observe results. These are 2 things chefs do that many home cooks are ignorant of and that cause inconsistent results. Cooking by time is possibly the worst way to cook. Check doneness before you think you need to.
Hi Kate!
Having looked through the comments, I feel better knowing I’m not the only one who messed up! I overcrowded a pan that goes in the oven , DIDN’T use parchment paper…I was rushed and didn’t read recipe CAREFULLY. I also overcrowded the fries…..I’m just starting to cook again after long illness! This recipe was a great learning experience!!
The result was still yummy!
I’m sorry it wasn’t the best turnout, but glad you enjoyed it! Yes, all of those elements are key to get them crispy. I’m glad you are on the mend, Carrie!
Great recipe ! You’re project is a treasure… I’ve been oven , “frying,” a long time. I actually oil veggy first and then dust with flour, 2 Tbl flour, 1 tsp Organic Sea Salt, in bag, add veggy and shake. Your suggestion for using parchment paper is really spot on. I use an uncovered high sided roaster and take advantage of reflective heat. Keep on the great work.
I followed this recipe and they were the best sweet potato fries I’ve ever made! They were pretty crispy although some did blacken quite a bit. They were very good reheated the next day on my pizza stone so I will definitely be making these again.
Would cutting the heat back after turning help keep them from blackening so much?
Hi Jane! You could decrease your bake time some and that would help. Thank you for your review.
Don’t forget the garlic lime aioli! These are amazing, ty for the detailed instructions and pics! 2nd (or 3rd lol) batch on the oven now.
These were the best Sweet Potato fries I have ever made. Hot, crispy and delicious. This will be my go to recipe. Thank you for sharing.
Wonderful! I’m glad you loved them. Thank you for your review, Colleen.
The sweet potato fries were delicious. The recipe was followed with attention to each step. It was important to turn all fries over after 20 minutes. They were as good as any sweet potato fry in a restaurant; soft, but firm, with the texture of a well cooked sweet potato. I will only use this recipe in the future for sweet potato fries.
Thank you for sharing, Susan! I’m glad you loved them.
Not sure what I did wrong but I set off the fire alarm 12 minutes in.. it’s almost as if the temp was too hot. Flipped them and cooked for 3-4 mins on the other side and pulled them out. Didn’t turn out for me!
HI Brianna, were you using a conventional or convection oven?
It sounds to me some people can’t follow directions.. I made these and they turned out great. To me it was a no fail recipe. My mother who is very skeptical about new things ate the most of anyone. She said make them again. I have a picture of them still on the cookie sheet. But am not on Instragram, sp can’t share the picture. Will be making them again for sure.
That’s great to hear these worked so well for you, Alexander!
I loved your description of the process. Cant wait to try! the only thing that I would change is to add the seasonings at the beginning. I’ll let you know how it goes
…how long in the oven?
Hi Ben, see step 4 and 6. I hope you love them!
These turned great! I followed the instructions and they cooked perfectly. My kids loved these fries, I’ll definitely make them again!
Great to hear, Nita! I appreciate your review.